For pet lovers, there’s nothing more rewarding than showcasing your furry, feathered, or scaly companion in a unique way. Turning a photo of your pet into a custom sticker lets you personalize your laptop, phone case, water bottle, or even your car with their adorable face. Whether it’s your dog’s joyful grin, your cat’s intense stare, or your parrot’s vibrant feathers, a sticker is a fun way to keep them close.
In this comprehensive guide, we’ll walk you through the process of how to turn a photo into a sticker, from selecting the perfect photo to choosing editing tools, printing materials, and creative applications. Based on personal testing and insights, this tutorial ensures your stickers are vibrant, durable, and uniquely yours. Let’s dive in!
Why Pet Stickers Are So Popular
Turning a photo into a sticker has become a beloved trend among animal lovers, and it’s easy to see why. The main reason it is so popular is that it allows a pet owner to create a unique personalized product that captures everything we love about our pets in a fun, easy, and accessible way. Here are some of the reasons why pet stickers have found their way into our culture:
Emotional Attachment: Pets are family, and having stickers of your pet on your coffee mug, your car, and everywhere in your life is one way to show the world your love. You will have a little reminder of the joy your pet has brought into your life.
Creative Expression: there are stickers in all styles, from cartoon to chibi to realistic. You can honor your pet's charm while still being true to your style. For example, my cat Whiskers has a sticker as a chibi, so I can know whenever I open my notebook it will have a humorous touch.
Affordable Customization: While personalized pet portraits and merchandise can cost a pretty penny, stickers are affordable, and they are extremely easy to create too. This allows everyone the opportunity to honor their pet in a personalized way.
Versatile Uses: Stickers can decorate personal items, label pet gear, or serve as thoughtful gifts. They’re perfect for pet meetups, adoption events, or even small businesses selling pet-themed products.
Choosing the Right Pet Photo
The number one and most important step of making pet stickers is picking the right image because a sticker is only as good as the picture was that created it, so take your time with this important choice!
Tips when picking the best photo of your pet:
- High Resolution: Choose an image with at least 300 DPI for crisp printing. Low-resolution photos (e.g., 72 DPI) will appear pixelated when enlarged.
- Good Lighting: Natural daylight works best to capture accurate colors and minimize shadows. Avoid flash photography, which can create harsh contrasts.
- Sharp Focus: Ensure your pet is the focal point, with clear details like fur texture or eye sparkle. Blurry or grainy shots won’t translate well.
- Simple Background: A plain or uncluttered background makes it easier to isolate your pet during editing. Busy backgrounds (e.g., a crowded park) complicate the process.
- Close-Up Shots: Focus on your pet’s face for maximum impact. A close-up of their expressive features—like a puppy’s soulful eyes or a bunny’s twitching nose—creates a striking sticker.
It is hard to go wrong choosing a sticker detail from a close-up shot of your pet's face! If it is a joyful doggy grin, a cute cat stare, or brilliant parrot feathers, just remember to focus on them.
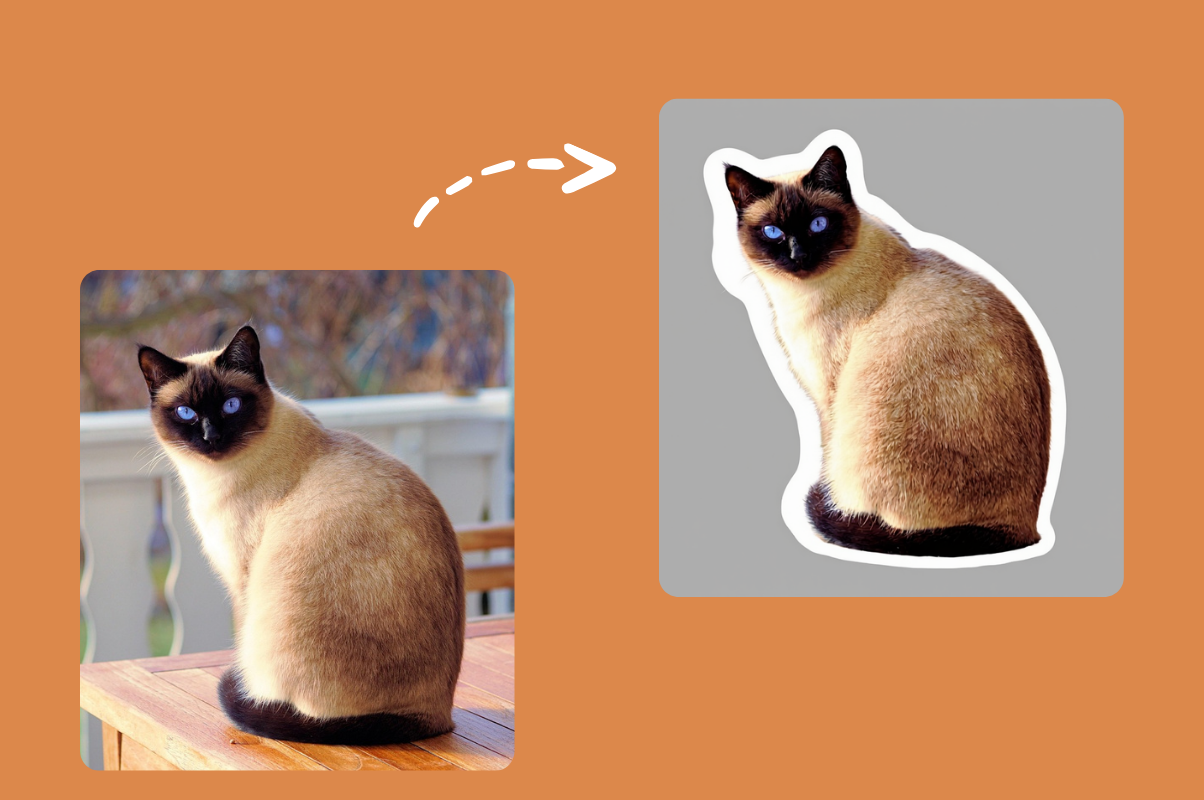
Pro Tip: I used this technique with a photo of my Siamese cat, Whiskers, with soft morning light on her. The face was clear so removing the background was simple, and I ended up with a nice looking sticker that is super bright and "pops" on my laptop.
Using Online Tools to Turn a Photo into a Sticker
Once you’ve selected the perfect photo, it’s time to turn a photo into a sticker. This involves removing the background, refining edges, and adding design elements like borders or effects.
Turning a photo into a sticker has a long way to go. Traditional design software is still very powerful, but with the introduction of AI, there are specialized tools that can get you to a stunning pet sticker in mere clicks! Let's look at both ways so you can pick your method based on need and level of skill!
1.Traditional Design Tool
Adobe Photoshop has long been the gold standard for detailed image editing. It’s perfect for creating professional-quality stickers if you’re comfortable with design tools.
Steps to turn a photo into a sticker in Photoshop:
- Open Your Image: Import your pet photo into Photoshop.
- Select the Background: Use the Quick Selection or Magic Wand tool to outline the background. For complex fur, the Pen Tool offers more precision for pet stickers.
- Remove the Background: Press Delete or apply a Layer Mask to isolate your pet. Zoom in to check for stray pixels.
- Refine Edges: Use the “Select and Mask” feature to smooth out edges, especially for fluffy pets like my golden retriever, Whiskers, whose fur required careful tweaking.
- Add a Border: Duplicate your pet’s layer, expand it by 5–10 pixels (Select > Modify > Expand), and fill it with white for a classic custom pet sticker look.
- Export: Save as a PNG with a transparent background for printing compatibility.
2.Turn Your Pet’s Photo into a Sticker with AI
InsMind
InsMind’s Photo to Sticker Maker excels at turning a photo into a sticker with minimal effort. Its AI-driven background removal is highly accurate, cleanly isolating complex subjects like Whiskers’s fluffy fur in seconds. The platform offers a robust editing suite, allowing users to add text, emojis, clipart, and filters (e.g., cartoon or watercolor effects). The free plan includes unlimited sticker creation with no watermarks, making it ideal for beginners. However, some advanced effects require a paid upgrade (~$10/month).
Best for: Pet owners seeking a free, versatile tool for quick, high-quality custom pet stickers.
Canva
Canva’s Magic Studio suite simplifies making pet stickers online.Using AI-powered background removal, it cleanly isolates subjects like Whiskers’ striped fur, even in complex images. The platform offers extensive templates, text options, and effects (e.g., neon or watercolor), with a free plan that includes basic sticker creation and no watermarks. The Pro plan (~$15/month) unlocks advanced AI tools like Magic Grab for precise edits. Registration is required, which may slow down casual users.
Best for: Beginners who prefer template-driven designs for DIY pet stickers.
iColoring AI
iColoring's Free Online AI Sticker Generator is a standout for its variety of style options and no-signup convenience. It offers seven styles (Realistic, Chibi, Cartoon, etc.),adding creativity to your custom pet stickers.The AI’s background removal is reliable for simple photos. With 30+ free daily credits and no watermarks, it’s budget-friendly.
Best for: Users wanting fast, free pet stickers with creative styles.
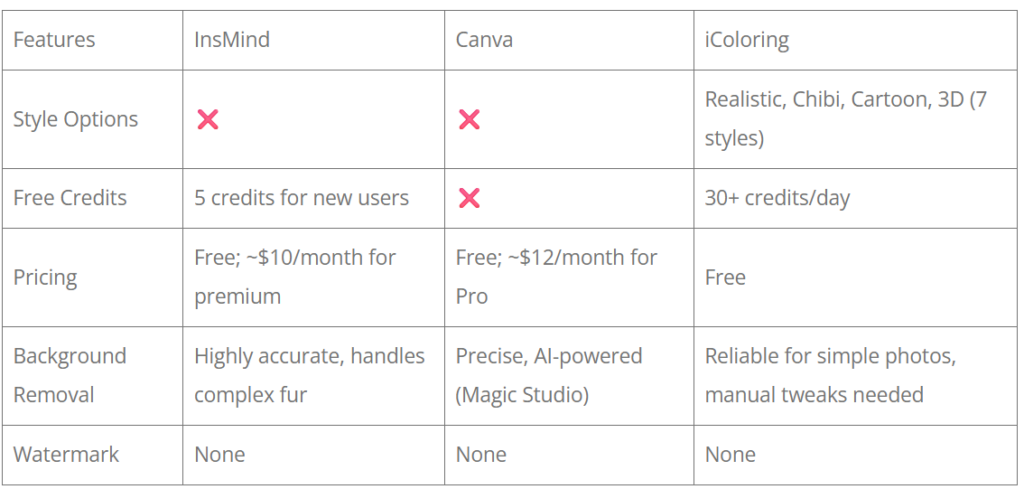
Comparison Table:
Step-by-Step Tutorial: Making Pet Stickers with iColoring AI
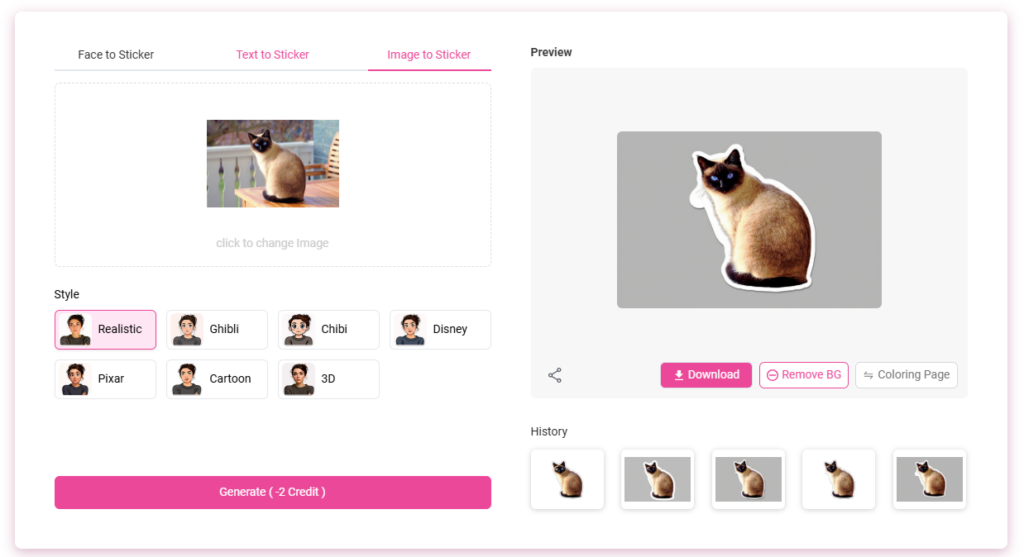
Upload Your Photo
Open iColoring’s Free Online AI Sticker Generator and upload a photo of your pet. The AI will instantly detect the subject and get it ready to be turned into a sticker.
Choose a Style
Select styles like cartoon, realistic, Chibi to customize your pet stickers. (7 style are free to choose).
Generate
The AI removes the background, sharpens edges, and applies effects in seconds.
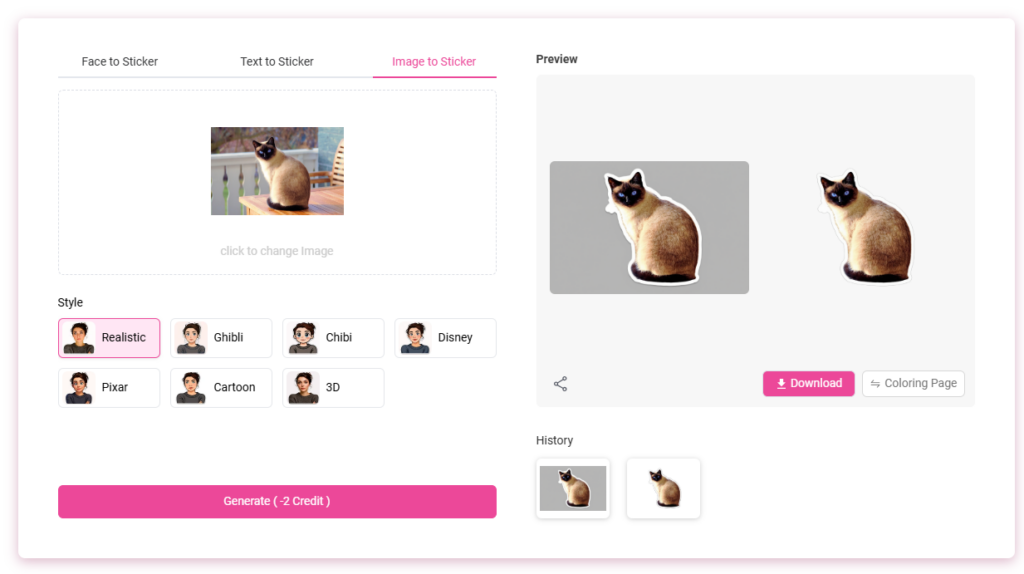
Remove Background
The generated pet sticker has a gray background by default. Click “Remove BG” for a transparent PNG.
Download
Simply hit “Download” and you’ll get a PNG ready to print.
Printing Your Pet Stickers
Once your design is ready, it’s time to bring your custom pet stickers to life. You can print at home for small batches or use professional services for bulk orders or premium quality.
Home Printing
- Materials: Use sticker paper or printable vinyl compatible with your inkjet or laser printer. For outdoor use, opt for waterproof vinyl (e.g., Avery Printable Vinyl).
- Printer Settings: Match settings to your paper type (e.g., “Glossy” or “Sticker Paper”) for optimal color and adhesion.
- Finishing Touches: After printing, cut stickers manually or use a cutting machine like Cricut for precise shapes. For durability, apply a clear laminate sheet or spray with a protective coating.
Tip: When printing my cat’s sticker at home, I noticed slight color shifts. Adjusting my printer’s color profile to “Vivid” fixed the issue.
Professional Printing Services
- Benefits: Services like Sticker Mule or Vistaprint offer superior color accuracy, die-cut shapes, and durable materials like vinyl for outdoor use.
- Process: Upload your PNG design, choose size and material, and receive custom pet stickers shipped to your door.
- Cost-Effectiveness: Ideal for bulk orders (e.g., 50+ stickers) or unique shapes that are hard to cut at home.
Pro Tip: For my dog’s stickers, I used a professional service for a batch of 100 die-cut stickers. The glossy finish and precise cuts made them perfect for gifting.
Creative Ways to Use Your Pet Stickers

Personal Items
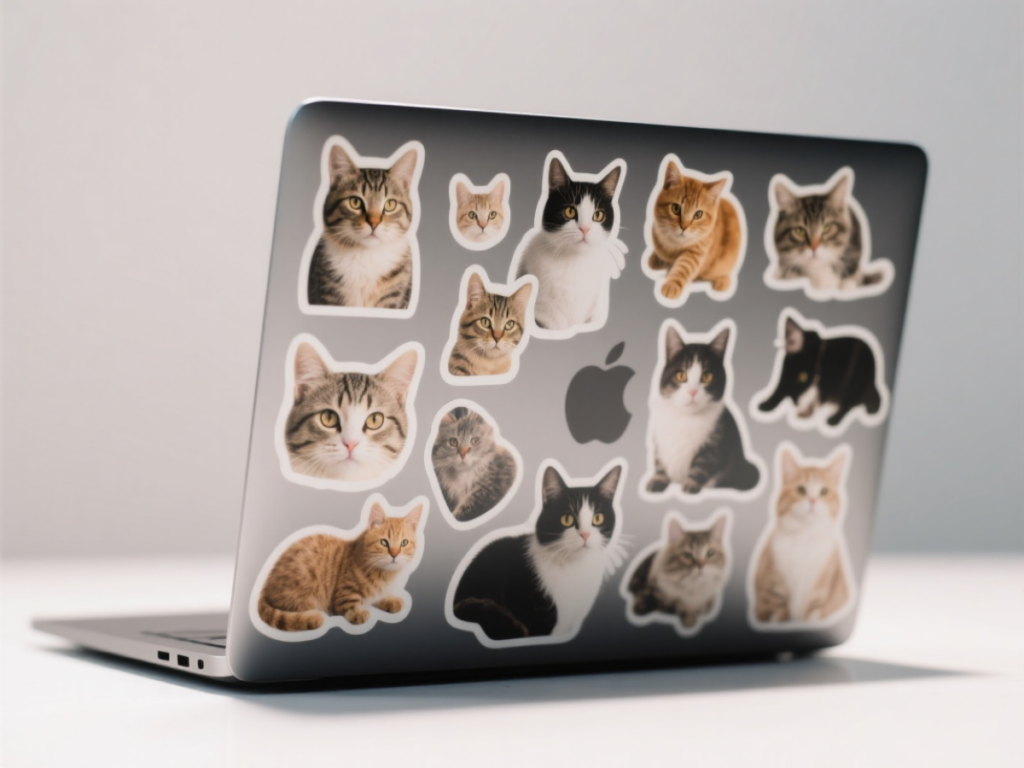
Use your pet stickers to decorate your phone case, laptop, notepad, car window, or anything else that you want to personalize to show your love for your pet.
Pet Gear
Use them on your pet’s bowls, water bowls, leashes, or even toy boxes. If you have multiple pets; you can even comfort of the stickers, to give each of your pets their own designs, and for those of us with more than one pet, it can help keep their belongings identified.
Pet Stickers as a Gift
Gift uses are equally utilized. Custom pet stickers will make a fun gift for other pet owners, especially if they include their pet images. If you have multiple small images per sheet, photo sticker sheets, are fun because the customer can mix and match.
Pet Events
Use stickers to add a fun touch to pet-themed parties, adoption days, fundraisers, or local meetups. They make great giveaways, name tags, or even decorations. For example, I once created a custom set of pet stickers for a local adoption event, and they turned out to be a huge hit—attendees loved taking them home as a keepsake.
FAQ
Do I need any design skills to make a pet sticker?
Many online tools and apps make it easy to turn a photo into a sticker by removing the background, cropping, and adding effects — perfect for beginners. You can also use iColoring AI’s Free Online AI Sticker Generator to instantly transform your pet photo into various fun styles like cartoon, comic, and etc.
What size should I make my pet stickers?
Common sizes range from 2–4 inches for laptops and phone cases, but you can make larger ones for walls or car decals.
What can I do to make my pet stickers waterproof?
You can print it on waterproof vinyl sticker paper, and add a laminate, or spray with a clear protective coating to help resist water and scratches.
Can I sell pet stickers?
You can sell them as long as you have ownership of the photo and design. If the photo of your pet includes someone else's copyrighted material like a logo or branded background, you will need to gain permission.
Conclusion
Turning your pet photos into stickers is a fun, rewarding way to celebrate your animal companions.From choosing the perfect snapshot to using AI tools or professional printing, this guide covers everything you need to create vibrant custom pet stickers.With the development of AI, making pet stickers online is easier than ever.Start simple, experiment with styles, and share your creations (tag us on X). Your pet deserves to shine on every surface you love.